Under Windows #
Setting up your PC's network card #
- Right-click on the WIFI symbol on the Home screen.
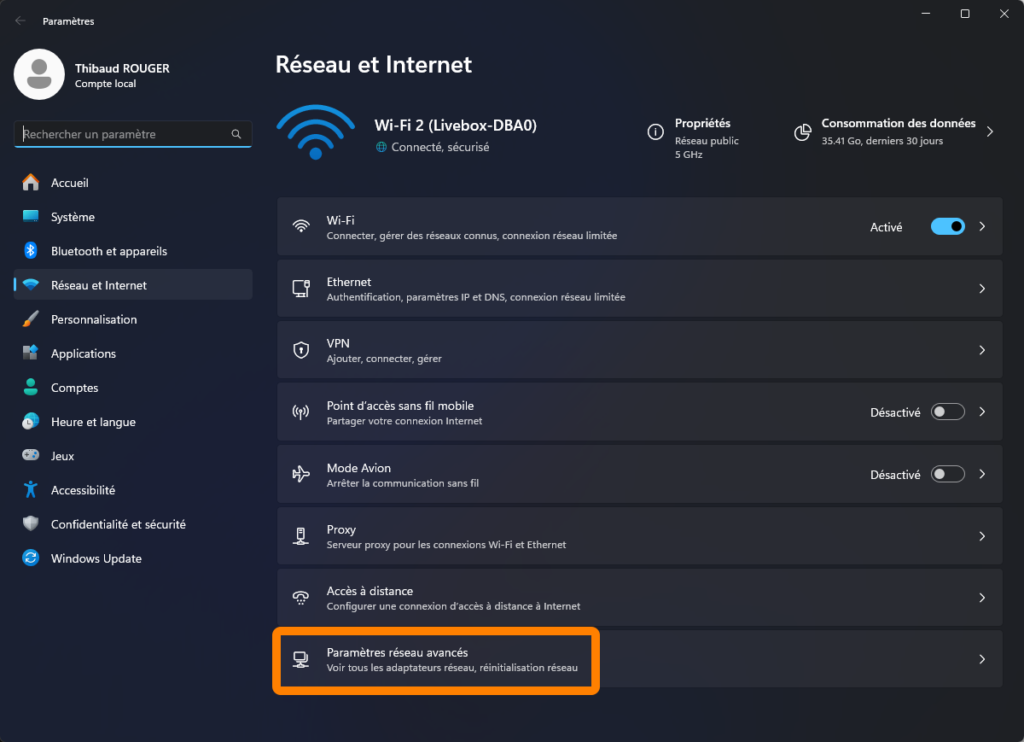
- Select “Network and Internet settings”.

- Select “Advanced network settings”.
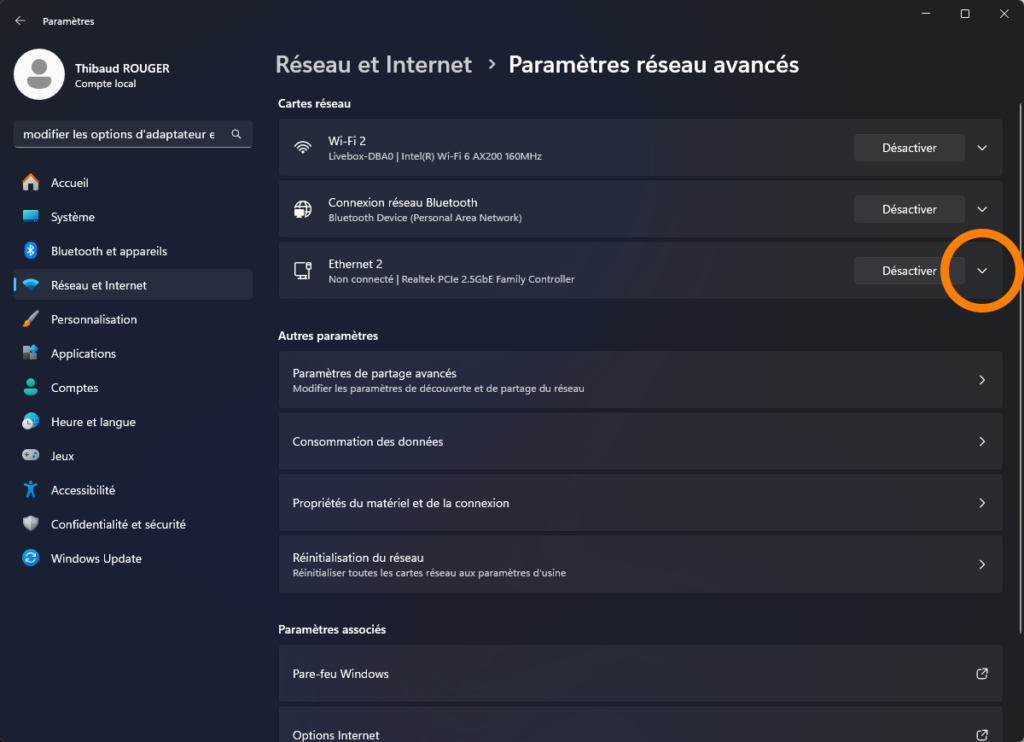
- Expand the “Ethernet 2” ribbon
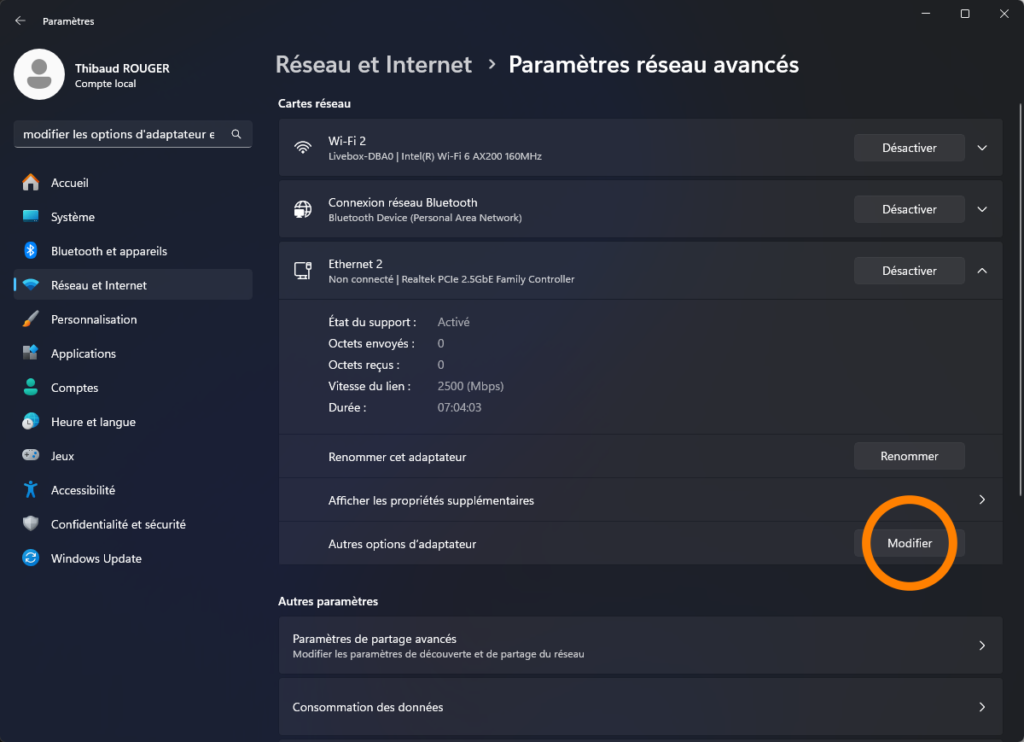
- Click on “Modify
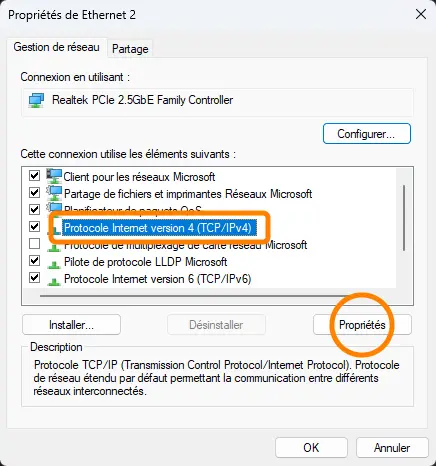
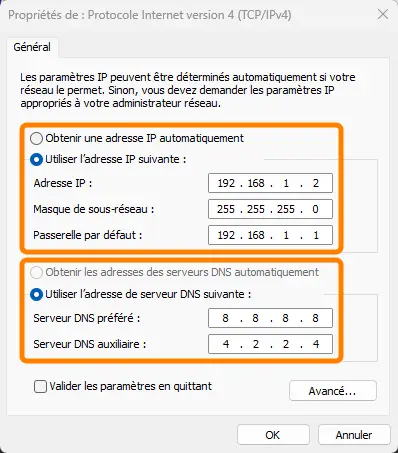
- Select Internet Protocol TCP/Ipv4. Select “Properties” or double-click.
- Select “Use the following IP address” and enter “192.168.1.2“.
- Enter “255.255.255.0“in the subnet mask field.
- Enter “192.168.1.1“in the default gateway field.
- Select “Use the following DNS server address”.
- Enter “8.8.8.8“in the “Preferred DNS server” field.
- Enter “4.2.2.1“in the “Auxiliary DNS server” field.
- Confirm your settings by clicking “OK”, then close the command box.
Access to advanced settings #
Please connect your RJ45 cable between your PC and the terminal’s RJ45 port, and make sure your terminal is powered up.
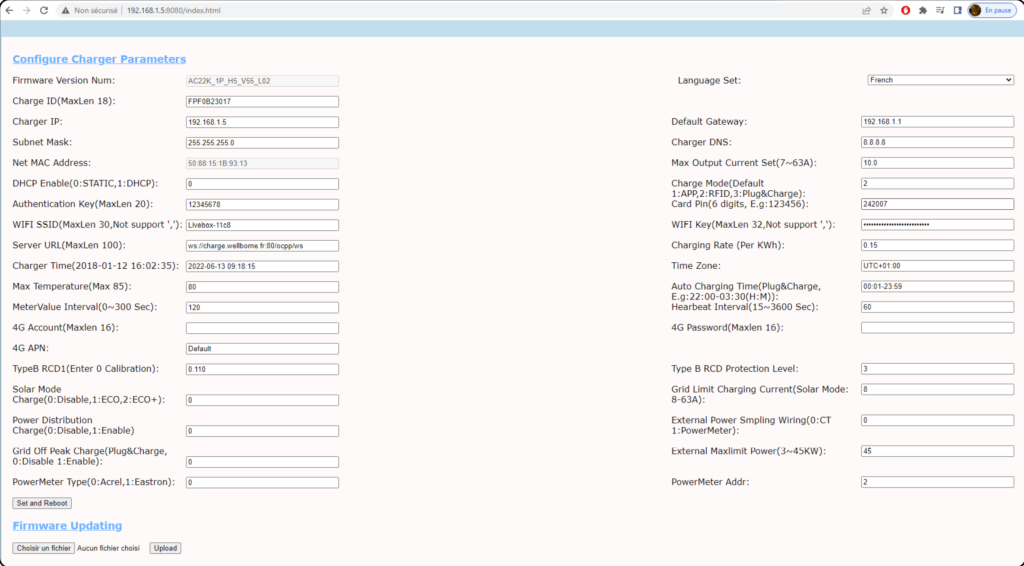
- Open a web browser and enter the following IP address: “192.168.1.5:8080“.
- The “Terminal parameters configuration” page appears, then, if requested, enter the following password: ” “.12345678“.
Putting the terminal online #
Via Wi-Fi with your computer #
NB. 1 Some routers have 2 WiFi, one at 2.4GHz, the other at 5GHz. Most homes simply use 5GHz WiFi as their default WiFi. But the charger can only connect to 2.4GHz WiFi. So if the charger can connect to your cell phone’s hotspot, but can’t connect to the home WiFi, please check with the landlord or his box to see if it emits a 5GHz WiFi signal. Please use 2.4GHz WiFi to connect the charger. Help: https: //jib-home.com/frequence-wifi-2-4-objet-connecte/
NB. 2 When the WiFi signal strength is below -75dbm, the charging station cannot connect to WiFi. Download the WiFi signal strength test tool from the APP store to check whether the WiFi signal strength connected to the charging station is greater than – 75dbm. If the WiFi signal strength is low, we recommend using an AP repeater to increase the signal strength, thus extending the range.
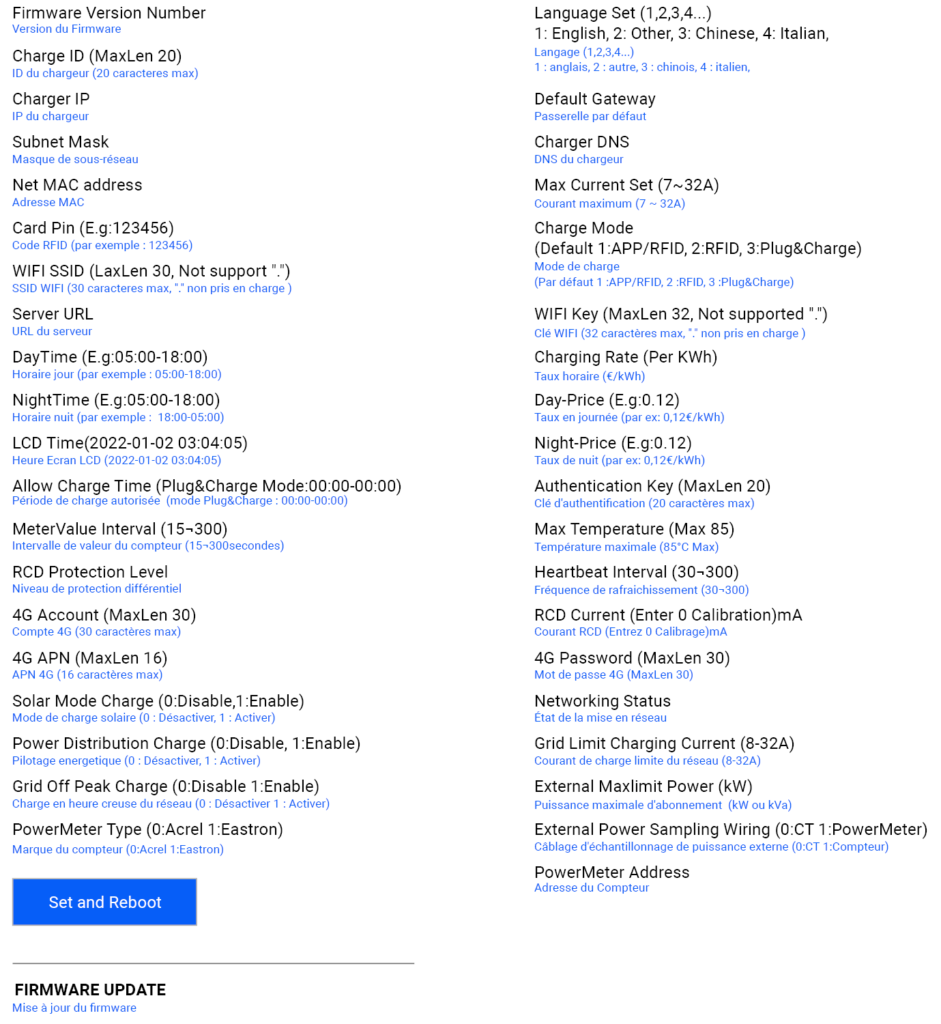
- Enter the name of your Wi-Fi connection, for example “Livebox-11c8”.
- Enter your Wi-Fi connection password (this must not exceed 32 characters and must not contain any ‘,’)
- Once the information has been correctly entered, click on “Set and Reboot”.
- Unplug your RJ45 cable when the terminal flashes yellow.
Via 4G with your computer #
- Enter the 4G APN address supplied with the SIM card after inserting it in its slot, e.g. SIM card 1NCE recommended. 4G APN address : iot.1nce.net.
- Once the information has been correctly entered, click on “Set and Reboot”.
- Unplug your RJ45 cable when the terminal flashes yellow.
Via RJ45 to your computer #
I. Try the automatic Internet connection mode
- Connect your RJ45 cable between your PC and the terminal’s RJ45 port, and make sure your terminal is powered up.
- Open a web browser and enter the following IP address: “http://192.168.1.5:8080“.
- The “Terminal parameters configuration” page appears, then, if requested, enter the following password: ” “.12345678“.
- In the “DHCP enable” field, select 1 (DHCP).
- Click on “Set and reboot”.
- The terminal emits a beep. Unplug the cable from your PC and plug in the cable from your Internet box. A few moments later, the bollard will connect to the Internet, which you can check by going to the WBcharge app, refreshing the page and seeing the bollard “available”.
- If this is not the case after a few moments, then you need to reconnect your PC to the terminal, but the IP address will have been modified automatically by DHCP mode, so you’ll need to connect to the hotspot to read the modified IP address and, if necessary, enter the terminal’s default IP address (192.168.1.5), and reset the network configuration to “Static” mode, then follow the steps below.
II. Get IP information from your Internet box
- Connect your RJ45 PC to the Internet box and disable WiFi on your PC.
- Press “Window+R” to open the execution bar.
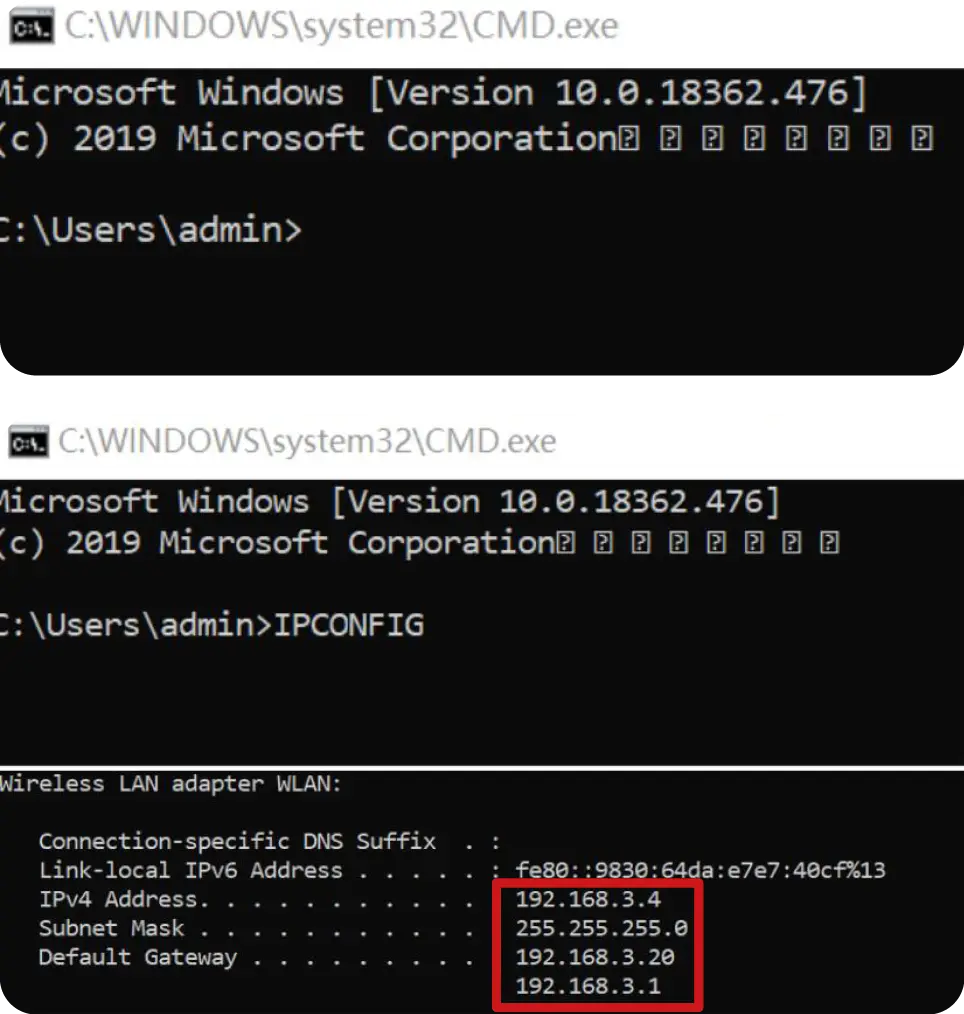
- Type “CMD” then “ipconfig”.
- Find the box’s IP address.
- Remember the following information: IPV4 address, subnet mask, default gateway.
III. Enter the terminal’s web interface
Connect your RJ45 cable between your PC and the terminal’s RJ45 port, and make sure your terminal is powered up.
- Open a web browser and enter the following IP address: “http://192.168.1.5:8080“.
- The “Terminal parameters configuration” page appears, then, if requested, enter the following password: ” “.12345678“.
- You can then check the firmware version on the settings page that appears.
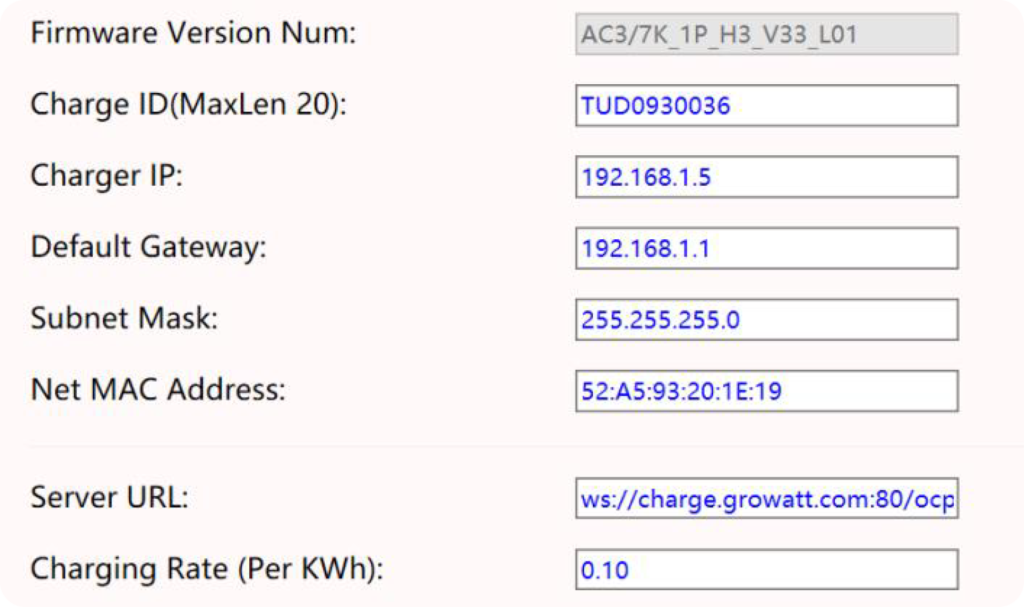
IV. Modify the following information so that they are identical to those on the box, except for the last number of the IPv4 address, which must be different
- In the “DHCP enable” field, choose 0 (Static).
- Replace IP address 192.168.1.5 by the IPV address 192.168.3.X (X being between 1 and 255, except 4 in our example).
- Replace default gateway 192.168.1.1 with the box gateway 192.168.3.1.
- Press Enter.
- Keep the subnet mask identical to the box’s subnet mask.
V. Click on “Set and Reboot
VI.
When finished, the terminal beeps and flashes yellow.
VII. Connect the network cable to the box when the terminal stops flashing, the terminal is now connected to the network.
Dynamic energy management #
Connect your RJ45 cable between your PC and the terminal’s RJ45 port, and make sure your terminal is powered up.
- Open a web browser and enter the following IP address: “http://192.168.1.5:8080“.
- The “Terminal parameters configuration” page appears, then, if requested, enter the following password: ” “.12345678“.
- Enter the maximum power of your electrical subscription (kW/kVA) e.g.: 100A x 230V = 23kW.
- Select “Power Distribution Charge” and enter “1”.
- Select the wiring method for external current sampling, enter 0 for the CT clamp or 1 for the counter (+ CT clamp).
- Select counter type, enter 0 for Acrel or 1 for Eastron.
- Select the meter address, enter the address details (on the side of the electricity meter or on the display by scrolling to ID).
- Click on “Set and Reboot”.
Activating solar mode #
How do I activate the solar mode on a bollard? There are two different solar modes on our bollards:
- ECO+ mode, which uses only the energy supplied by your solar panels, with a minimum requirement of 6A of production for recharging to start. If production falls below this level, recharging stops.
- ECO mode is a hybrid mode, which uses the solar energy supplied + a portion from the grid. The maximum amount of energy drawn from the grid is set.
- Deactivate external load (= dynamic control).
- Select the appropriate solar mode (ECO or ECO+). FAST deactivates solar mode
- Select the device that measures your general consumption (meter or CT). NB: In the case of CTs, read the label on the CT and calculate input/output. Ex: 100A/0.05A=2000–>CT 2000
- In ECO mode, select the maximum amount of energy from the grid.
- If it’s a counter, enter the model and address here.
- Click on “Set and Reboot”.
Activating solar mode #
Connect your RJ45 cable between your PC and the terminal’s RJ45 port, and make sure your terminal is powered up.
- Open a web browser and enter the following IP address: “http://192.168.1.5:8080“.
- The “Terminal parameters configuration” page appears, then, if requested, enter the following password: ” “.12345678“.
- Select “Max Output Current Set(A)”, then enter your maximum amperage (A) to limit charger power.
- Click on “Set and Reboot”.
WARNING! Wellborne accepts no responsibility for any changes made without its agreement.
The cable cross-section must be appropriate for the terminal’s maximum power rating.
Under MAC OS #
Setting up your Mac's network card #
Connect your Mac to the terminal via an Ethernet cable. If your Mac doesn’t have an Ethernet socket, you can use a Thunderbolt-Ethernet or USB-Ethernet adapter.
- Go to “System Preferences”, then “Network”.

- Select the “Ethernet” tab, then click on “Advanced”.
- Click on the “TCP/IP” tab and in “Configure IPv4”, choose “Manually”.
- In the IPv4 field, enter : 192.168.1.2
- In the Subnet field, enter : 255.255.255.0
- In the Router field, enter : 192.168.1.1
- Click on the “DNS” tab.
- Click on “+” and enter the value 8.8.8.8
- Click on “+” and enter the value 4.2.2.1
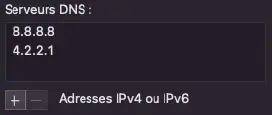
- Click “OK” then “Apply”.
Add your title here #
Putting the terminal online #
Via RJ45 with your Mac #
I. Try the automatic Internet connection mode
Please connect your RJ45 cable between your Mac and the terminal’s RJ45 port, and make sure your terminal is powered up.
- Open a web browser and enter the following IP address: “http://192.168.1.5:8080“.
- The “Terminal parameters configuration” page appears, then, if requested, enter the following password: ” “.12345678“.
- In the “DHCP enable” field, select 1 (DHCP).
- Click on “Set and reboot”.
- The terminal emits a beep. Unplug the cable from your Mac and plug in the cable from your Internet box. A few moments later, the bollard will connect to the Internet, which you can check by going to the WBcharge application, refreshing the page and checking that the bollard is “available”.
- If it doesn’t happen after a few moments, you’ll need to reconnect your Mac to the terminal, but the IP address will have been automatically modified by DHCP mode, so you’ll need to connect to the hotspot to read the modified IP address and, if necessary, enter the terminal’s default IP address (192.168.1.5), and reset the network configuration to “Static” mode, then follow the steps below.
II. Get IP information from your Internet box
- Connect your Mac via RJ45 to the Internet box and disable WiFi on your Mac.
- Connect your Mac to your Internet box via an Ethernet cable. If your Mac doesn’t have an Ethernet socket, you can use a Thunderbolt-Ethernet or USB-Ethernet adapter.
- Turn WiFi off on your Mac (via the logo in the top right-hand corner).
- Go to “System Preferences” then “Network”.

- Select the “Ethernet” tab, then click on “Advanced”.
- Click on the “TCP/IP” tab, then in “Configure IPv4”, choose “Via DHCP”.
III. Set up your Mac to communicate with the terminal
- Connect your Mac to the terminal via an Ethernet cable. If your Mac doesn’t have an Ethernet socket, you can use a Thunderbolt-Ethernet or USB-Ethernet adapter.
- Go to “System Preferences” then “Network”.

- Select the “Ethernet” tab, then click on “Advanced”.
- Click on the “TCP/IP” tab and in “Configure IPv4”, choose “Manually”.
- In the IPv4 field, enter : 192.168.1.2
- In the Subnet field, enter : 255.255.255.0
- In the Router field, enter : 192.168.1.1
- Click on the “DNS” tab.
- Click on “+” and enter the value 8.8.8.8
- Click on “+” and enter the value 4.2.2.1

- Click “OK” then “Apply”.
IV. Enter the terminal’s web interface to configure it
Please connect your RJ45 cable between your Mac and the terminal’s RJ45 port, and make sure your terminal is powered up.
- Open a web browser and enter the following IP address: “http://192.168.1.5:8080“.
- The “Terminal parameters configuration” page appears, then, if requested, enter the following password: ” “.12345678“.
- You can then check the firmware version on the settings page that appears.
V. Modify the following information so that they are identical to those on your box, except for the last number of the IPv4 address, which must be different.

- In the “DHCP enable” field, choose 0 (Static).
- In the “Load IP” field, replace the address 192.168.1.5 with the address : 192.168.1.Xwhere X is between 1 and 255, except 93 (in our example).
- In the “Default Gateway” field, change the default gateway to 192.168.1.1 with the one indicated in front of “router” (in our example, it’s the same).
- Press “Enter”.
- In the “Subnet Mask” field, replace the subnet mask with that of your box.
VI.
Click on “Set and Reboot
VII.
When the procedure is complete, the terminal emits an audible “beep” and flashes yellow.
VIII.
Connect the network cable to your box when the terminal stops flashing.
The terminal is now connected to the network
IX.
Once you’ve finished configuring the terminal, if your Mac previously operated via a cable and RJ45 socket, remember to reset the IPv4 configuration to “Via DHCP”, otherwise it won’t have access to the Internet.
WARNING! Wellborne accepts no responsibility for any changes made without its agreement. The cable cross-section must be appropriate for the terminal’s maximum power rating.


